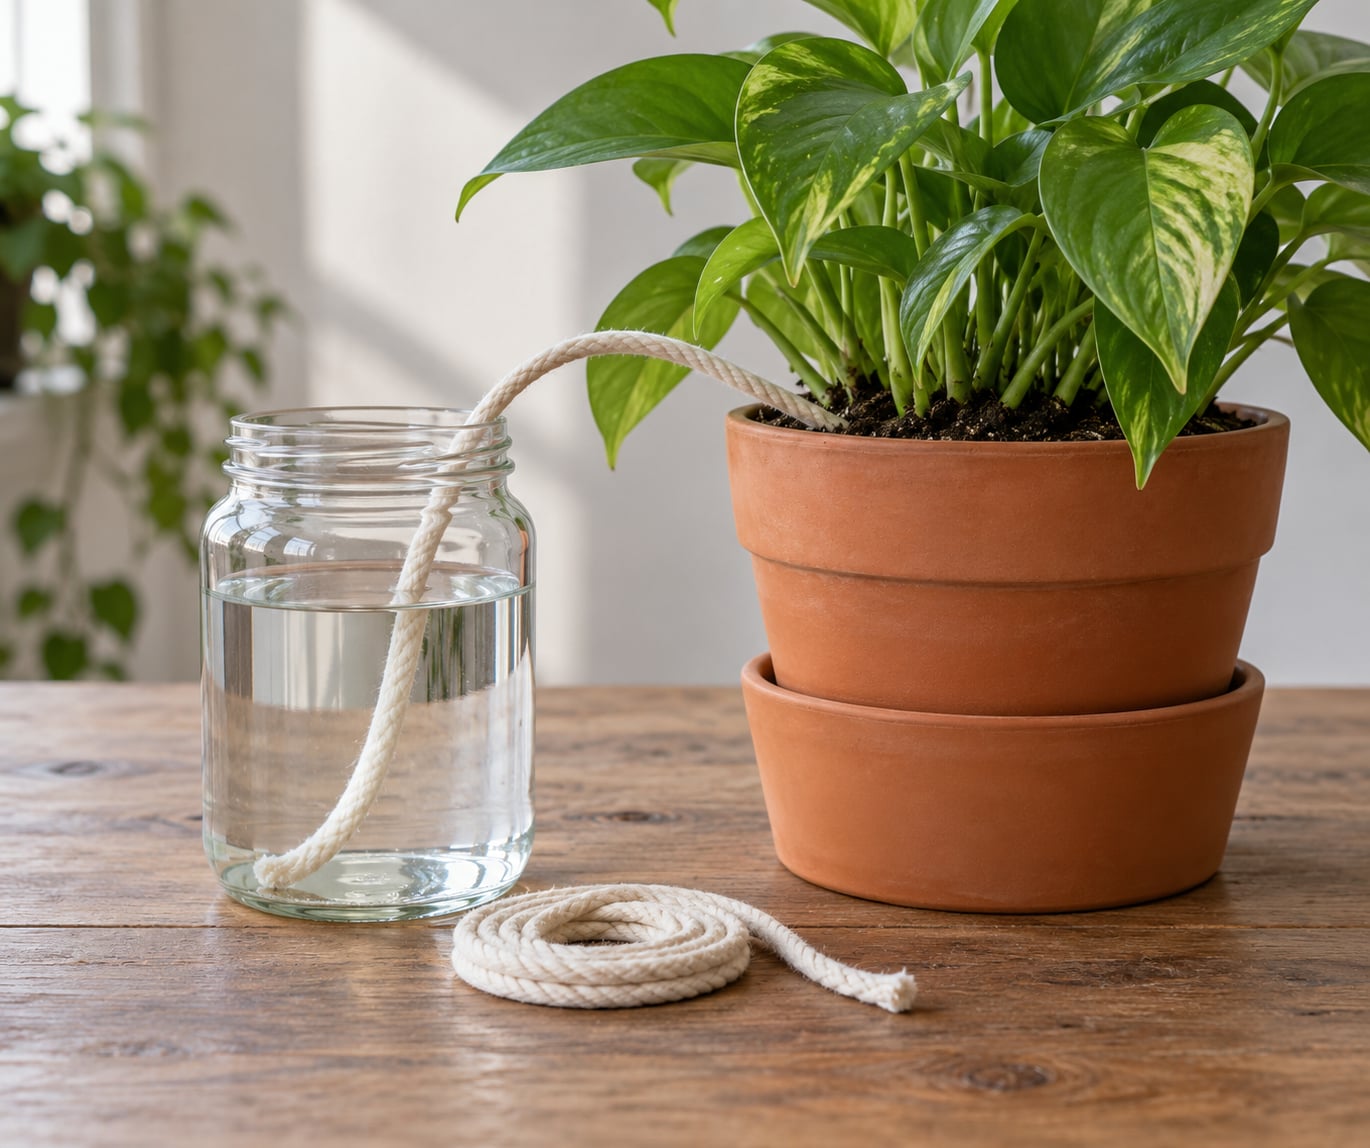
A plant watering wick system is simple: a length of absorbent rope runs from a pot of water into the soil of your plant, and capillary action pulls water up as the soil dries. Learning how to make a plant watering wick system takes about 20 minutes and costs almost nothing, and it keeps pots watered for days without anyone home.
The catch is that it works by physics, not by guesswork, and a bad setup floods the plant or starves it within two days. Here is the setup I would build, plus what to fix when it misbehaves.
Table of Contents
- What You Need
- Step-by-Step: How to Make a Plant Watering Wick System
- 1. Choose a Planter and Reservoir
- 2. Prepare the Wick for Long-Term Reliability
- 3. Position the Wick in the Planter
- 4. Add a Moisture-Control Layer
- 5. Fill and Assemble Your Watering Wick System
- 6. Test and Adjust the Watering Rate
- Common Mistakes
- Adapting the System for Different Plants
- Maintenance and Troubleshooting Tips
- Frequently Asked Questions
- What material works best for a plant watering wick?
- How long should the wick be for a self-watering planter?
- Can I use a cotton rope as a watering wick?
- How often should I refill a wick-watering system?
- Will a plant watering wick system cause root rot?
- Start With a Small Test System
What You Need
The minimum safe setup is three things: a planter that holds water without leaking, a porous wick, and a way to keep the soil from washing into that water.
- A planter with a watertight inner pot. A cachepot with no drainage hole works, or a plastic nursery pot nested inside a decorative pot. Roots must never sit in standing water.
- A reservoir. A jar, bucket, bowl, or bottle deep enough to hold at least a week of water. A lidded container slows evaporation and keeps algae down.
- Wicking material. Nylon or clothesline rope, ⅛ to ¼ inch (3 to 6 mm) thick, or cotton cord of a similar diameter.
- A small weight. A bolt, screw, washer, or paper clip to hold the reservoir end underwater.
- Tools. Scissors, a drill or hot iron for a wick hole, and a towel for drips.
- Optional: a small plug of clay or a square of geotextile fabric to hold soil back, a fan for the reservoir, and a ruler for checking slope.
Different materials move water at very different speeds, and thickness is the main dial. Thicker wicks carry more water, which is why cotton cord drawn from a thick hank is the usual cause of a swampy pot.
| Material | Thickness | Flow rate | Best for |
|---|---|---|---|
| Nylon clothesline rope | 3 to 6 mm | Steady, medium | Most houseplants, trips of one to two weeks |
| Cotton cord | 2 to 4 mm | High | Thirsty plants, short absences |
| Paper or felt strips | Thin | Low, short-lived | Weekend cover, seed trays |
| Cotton shoelace | 3 to 4 mm | High | Large containers, outdoor pots |
| Old T-shirt strips | Flat, wide | High | Free option, several plants on one reservoir |
Skip dyed or treated rope. The dye can leach into the water and onto the soil, which is why unbleached cord or nylon is the safer pick.
Step-by-Step: How to Make a Plant Watering Wick System
1. Choose a Planter and Reservoir
Pick a planter whose inner pot holds water without draining, and a reservoir at least 4 inches deep. The planter sits above the water, never in it, with a 2 to 3 inch (5 to 8 cm) riser or stand between the two.
You will know the fit is right when you can slide the inner pot in and out without the wick catching. Bigger pots drink more, so a 12 inch pot needs a larger reservoir than a 6 inch pot on the same wick.
2. Prepare the Wick for Long-Term Reliability
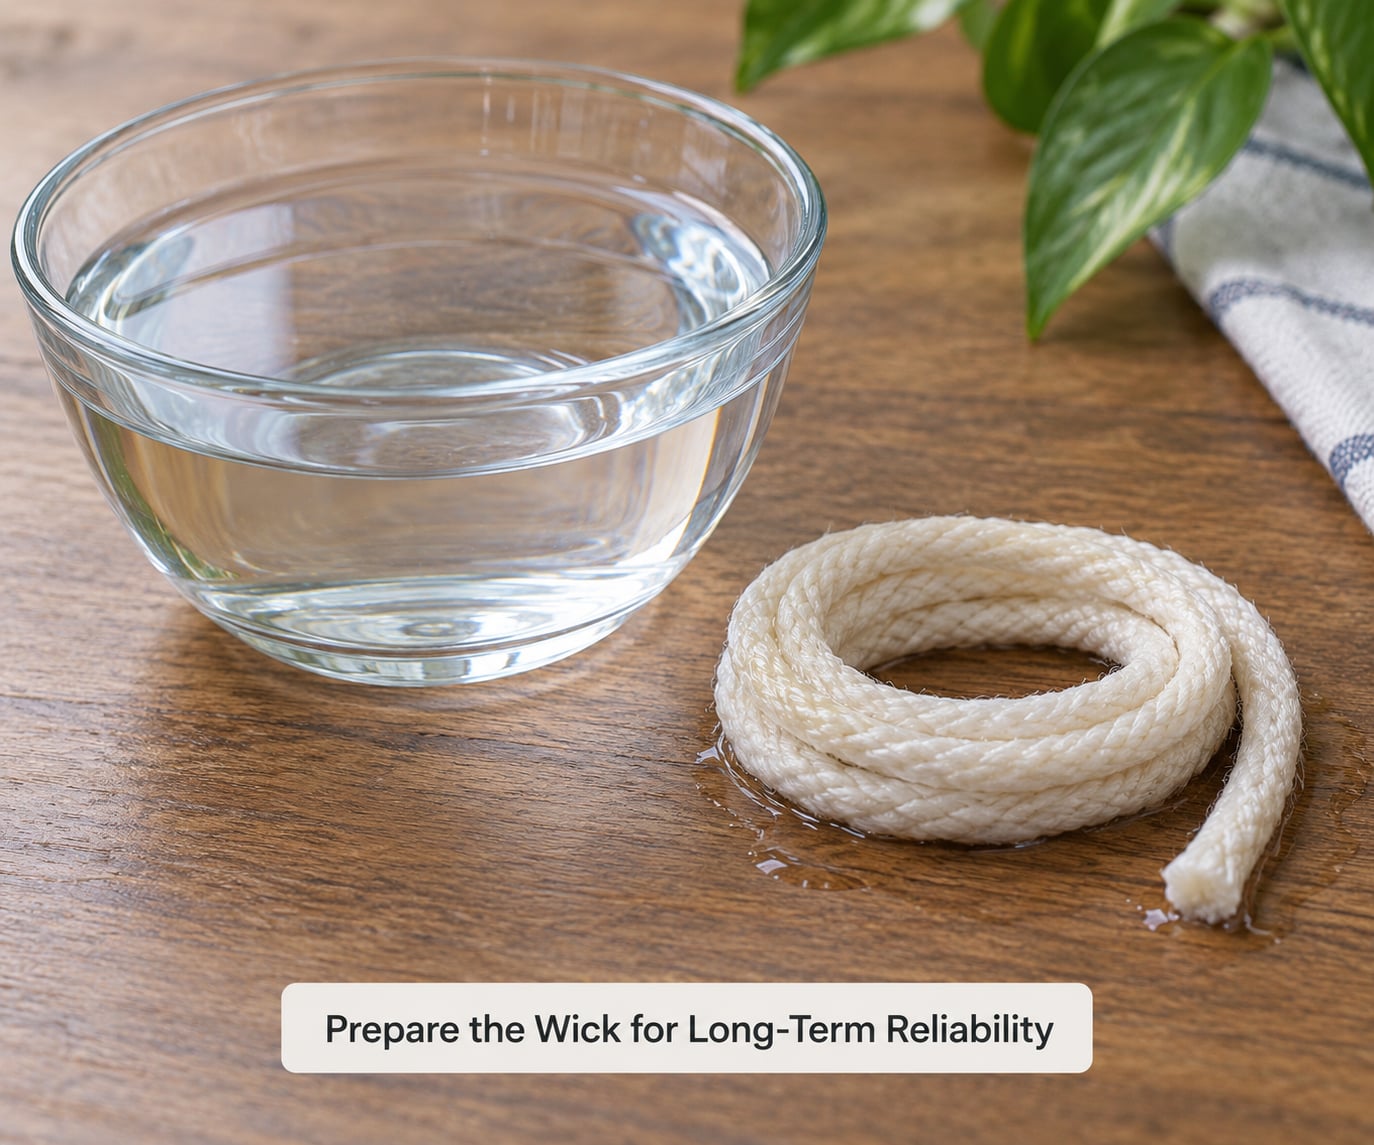
Cut the wick to 15 to 20 cm (6 to 8 inches). Capillary action slows sharply past about 33 cm, so a longer rope often just feels like a wet string with no flow.
Soak it completely before you install it. If it floats and sinks slowly and stays dark all the way through, it is ready. A dry wick installed into soil will pull air instead of water for the first hour, and that gap is often the reason a new system fails on day one.
3. Position the Wick in the Planter
Drill a hole near the bottom of the inner pot, feed the soaked wick down through it, and pull 1 to 2 inches (2 to 5 cm) of wick into the soil so it sits against the root ball, not loose in the mix. Pull the hole snug so the pot stays watertight.
If the pot has no drainage hole at all, lay the wick on the soil surface with the weight holding it against the mix instead. That surface method is slower, which makes it better for drier plants.
Run the wick from the soil down to the reservoir in one continuous downward slope. Any dip or slack in the line stops water, because gravity has to move it the whole way back up. This is the single most common failure I see, and it is fixed by tightening rather than lengthening.
4. Add a Moisture-Control Layer
If you are using the reservoir built into the pot rather than a separate bucket, press a small plug of clay or a square of geotextile over the wick hole. It stops potting mix washing into the water without sealing the pot shut.
Leave a gap at the rim so air can still reach the soil. A sealed pot with no air movement is what turns a wick system into a mold farm.
5. Fill and Assemble Your Watering Wick System
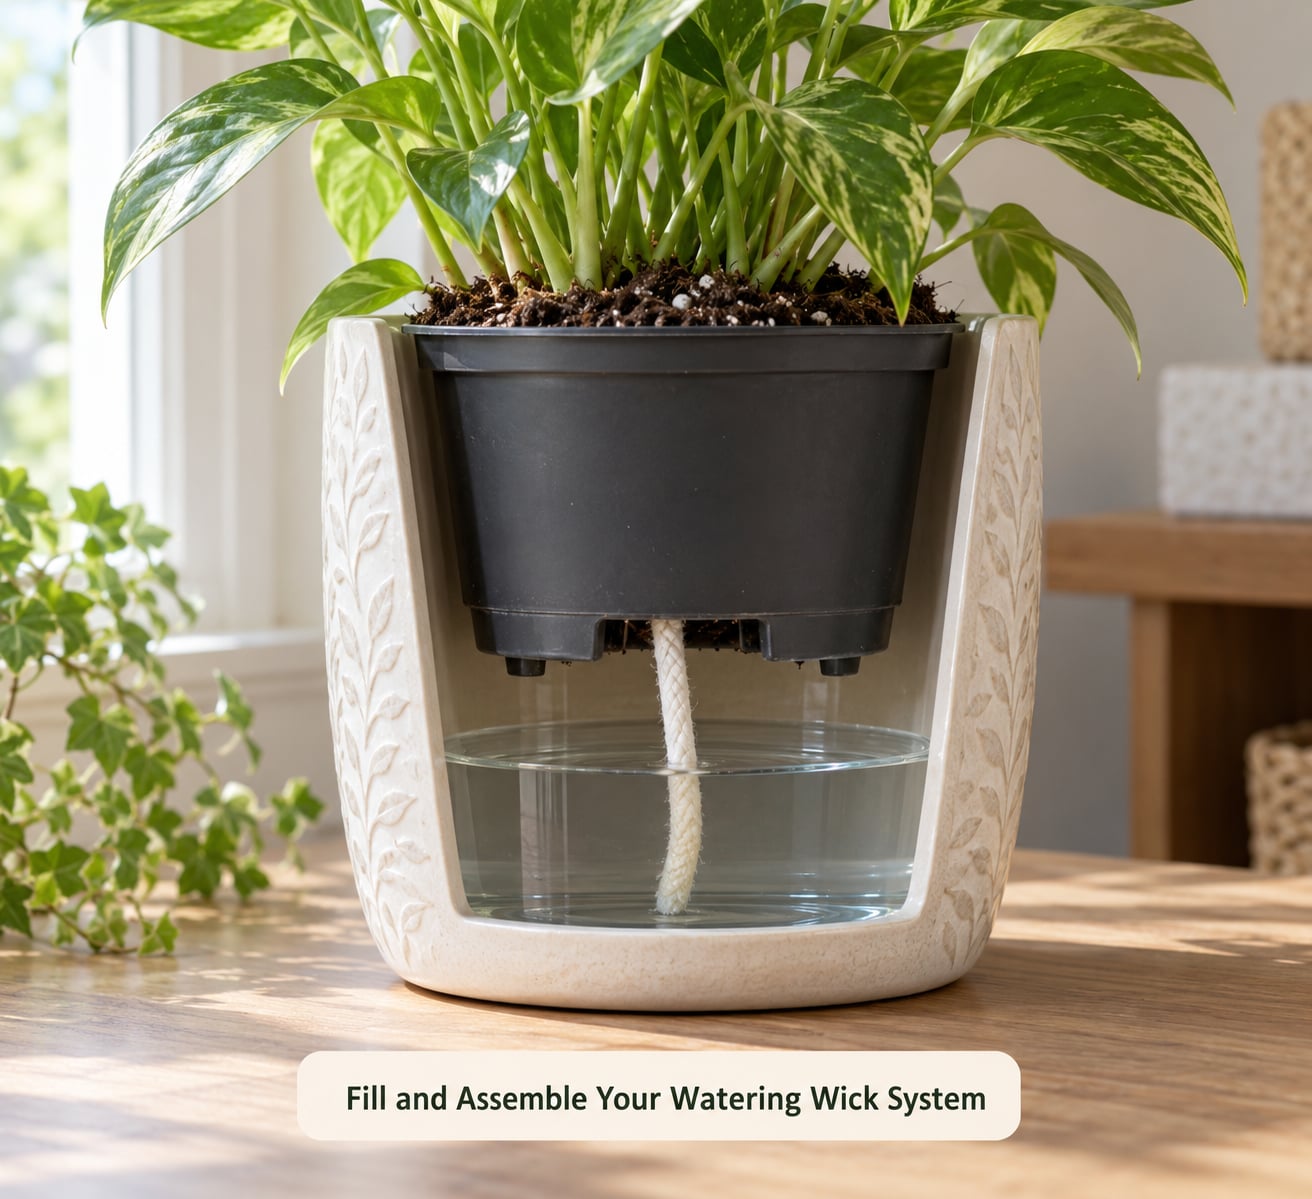
Add water to the reservoir until the weighted end of the wick sits about 1 inch under the surface. Attach the weight, drop it in, then seat the inner pot on its riser above the water line.
Trace the wick with your finger from soil to water to confirm the slope has no kinks. Cover an open reservoir with a lid or foil to cut evaporation and stop algae; a small fan aimed at the water does the same job in a warm room.
Let the system sit for an hour before you count on it. Soil wets fully in that time and the wick settles into its channel.
6. Test and Adjust the Watering Rate
Watch the reservoir level for three days before you leave. A gentle, steady drop means the flow is right. A fast drain means the wick is too thick or too many wicks are in one pot; a still reservoir means the soil is too dense or the wick is not reaching the root ball.
To slow it down, swap to a thinner rope, use one wick instead of two, or mix perlite into heavy soil. To speed it up, lengthen the slope, bury the wick deeper, or use a thicker cord.
A useful sizing rule: plan on roughly half a liter of water per small pot per week indoors, and closer to a liter for a 12 inch pot in summer. Double it for a hot, bright window.
Common Mistakes
Almost every wick failure is one of five things, and all of them are fixable in under a minute.
- Sagging or dipping wick. Water stops at the low point. Retension the line on a hook or clip so it runs straight down.
- Wick that is too thick. The pot floods and the roots never get air. Swap to something around 1 mm, or halve the strands. A single 4-strand cotton wick is usually plenty; doubling up is what leaves water standing in the saucer.
- Plant sitting in water. Roots in standing water rot. Raise the inner pot on a riser so its base sits above the reservoir surface.
- Clogged or unwetted wick. A dry or algae-slimed rope stops moving water. Trim the wick, soak it again, and rinse the reservoir.
- Heavy, airless soil. Compact mix blocks the wick channel. Blend in perlite so the soil is porous enough to pull moisture across.
Adapting the System for Different Plants
Some plants should never go on a wick system. Succulents, cacti, and anything that wants to dry out between drinks will stay wet too long and can rot, and cotton wicks make that worse because they run fast.
Ferns, calathea, and most tropical foliage plants do beautifully on a wick, though they drink fast enough that you will refill more often. Herbs on a balcony or patio need a bigger reservoir and a heavier wick than indoor plants, because sun and wind pull moisture out faster.
Low-water plants such as African violets and holiday cacti are better watered by hand. Wicking them keeps the mix damp at the root, which invites the rot those species are prone to.
Maintenance and Troubleshooting Tips
Check the reservoir every two or three days indoors, daily in summer heat or for a large pot. Refill before it empties, since an empty reservoir starves the wick faster than the plant can pull from dry soil.
Rinse the container weekly in hard-water areas, where minerals leave a white crust on the rim and can eventually clog the wick end. Wipe off green film on the inside; that is algae, and it comes from light hitting open water, so a lid fixes the cause rather than the symptom.
If a system has gone quiet, pull the wick out and soak it while you check the soil. A wick that stays dry usually means it was never saturated to the core, and a fresh soak usually brings the whole setup back to life.
Frequently Asked Questions
What material works best for a plant watering wick?
Nylon clothesline rope about 3 to 6 mm thick is the most reliable all-round choice, because it holds water without swelling shut or carrying too much. Cotton cord works but runs fast, so you will want a thinner gauge. Always use undyed rope, since dye can wash into the water and stain the soil.
How long should the wick be for a self-watering planter?
Keep it to 15 to 20 cm, roughly 6 to 8 inches. Capillary action slows sharply past about 33 cm, so a longer rope tends to stay damp at the bottom and dry at the top rather than delivering water. If you need more length, use two shorter wicks side by side instead of one long one.
Can I use a cotton rope as a watering wick?
Yes, cotton cord works well for thirsty plants and short absences, and cutting strips from an old cotton T-shirt is a free option that several readers have reported works. The caution is flow rate: cotton draws aggressively, so use a thin gauge and watch the reservoir for the first few days to be sure it is not overwatering.
How often should I refill a wick-watering system?
Every two or three days for indoor plants, and daily in summer heat or for a large pot. Plan on roughly half a liter per small pot per week indoors, closer to a liter for a 12 inch pot in bright sun. Refill before the reservoir runs dry, because an empty vessel stops feeding the wick immediately.
Will a plant watering wick system cause root rot?
It can, but only when the setup holds more water than the soil can take. The usual causes are a wick that is too thick, a planter that lets the pot sit in the reservoir, or a plant that prefers to dry out. Use a thinner wick, raise the pot above the water line, and leave succulents and cacti off wick systems entirely.
Start With a Small Test System
Build the system on one plant that is cheap to replace, watch it for four or five days, and adjust the wick thickness or reservoir size until the water level drops at a steady pace. Once that one pot behaves, the same numbers scale to everything else.
If you are learning how to make a plant watering wick system for a two-week trip, set it up two days before you leave so you have time to fix a kinked wick or a reservoir that drains too fast.