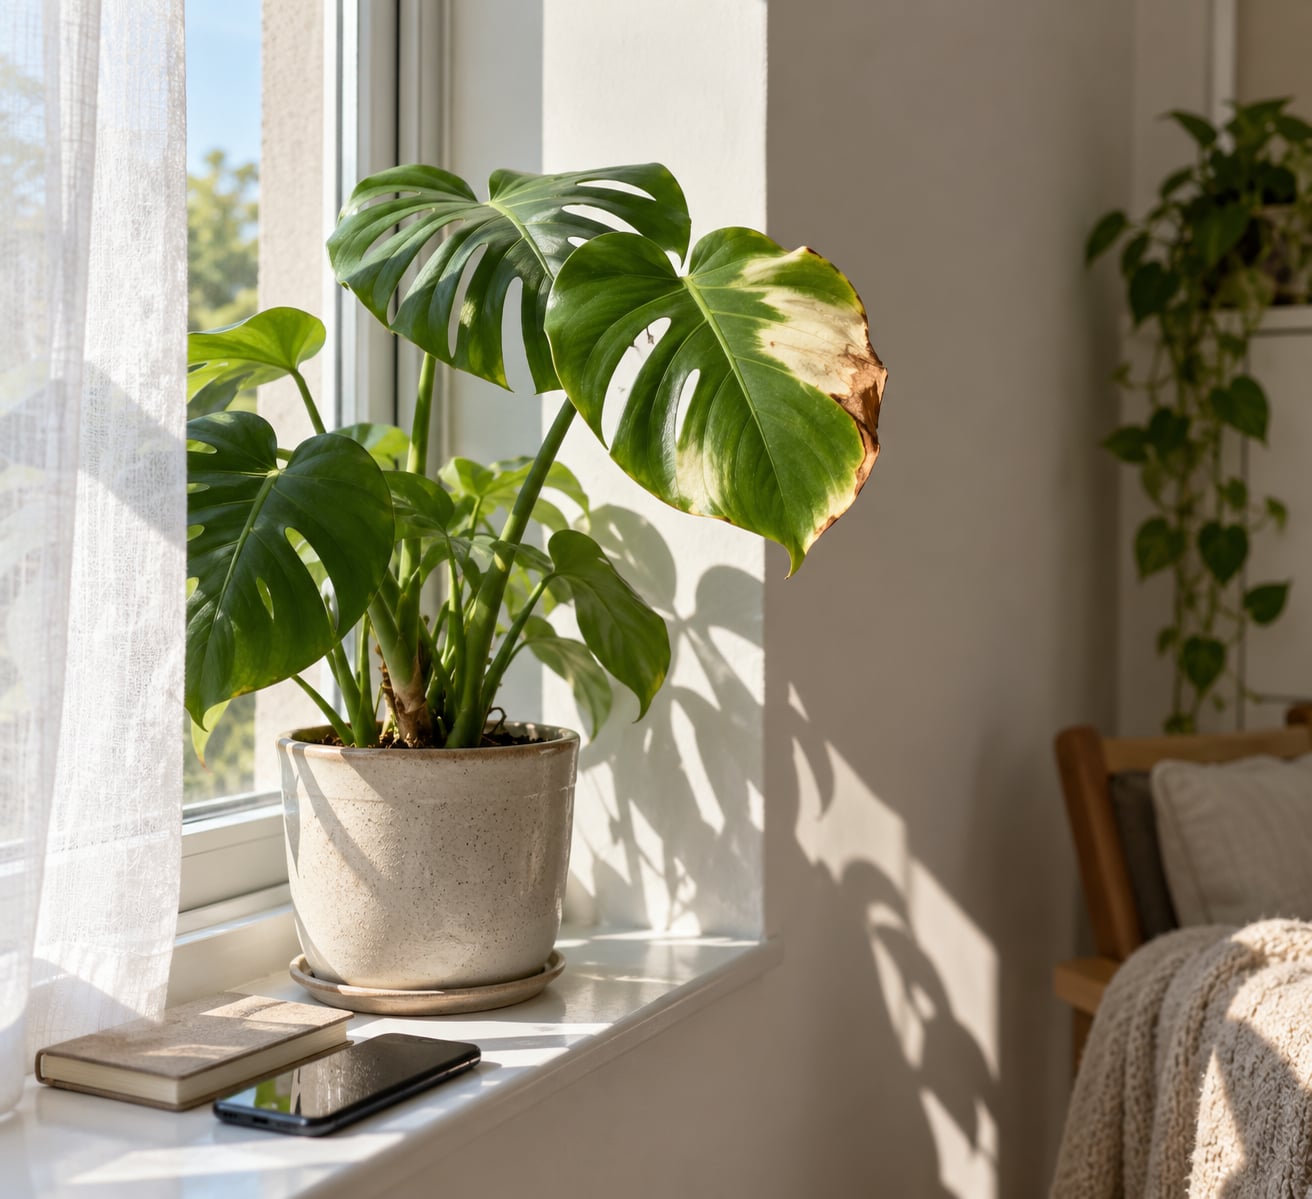
How to tell if a plant is getting too much light comes down to four things: bleached or papery patches, crispy brown margins, leaves that wilt in the middle of the day while the soil is still damp, and new growth that arrives small and thick. The pattern matters more than any single symptom, because scorch almost always starts on the side of the leaf facing the window or the grow lamp.
A plant that is genuinely overloaded with light is easier to rescue than most people assume. The leaves that already burned will not repair themselves, but the plant itself usually pushes out healthy new foliage once you fix the exposure and stop the watering spiral that usually follows.
The diagnosis takes about ten minutes if you work through it in order. Start with what the plant is supposed to want, then check where it actually sits, then read the leaves, then rule out the look-alike problems before you move anything.
Table of Contents
- What You Need
- Step-by-Step: How to Tell If a Plant Is Getting Too Much Light
- Check the Plant’s Ideal Light Requirements
- Inspect the Window or Growing Area
- Look for Signs of Light Stress
- Confirm the Pattern Before Moving the Plant
- Reduce the Light and Support Recovery
- Common Mistakes
- When to Check Light Again
- Frequently Asked Questions
- What does too much sunlight look like on plants?
- How do you recover a plant from too much light?
- Why is my plant wilting even though the soil is moist?
- How do you tell light burn from nutrient burn?
- Is 12 hours of grow light too much for plants?
- Can a plant get too much light with no visible damage?
- Conclusion
What You Need
Almost nothing. This is a diagnosis you do with your eyes and a bit of patience, not with equipment.
- The plant’s care label or species name — species tells you the light category the plant was built for, which is the whole basis of the diagnosis.
- A phone or small notebook — for noting the window, the time of day the sun lands on it, and when the first symptoms appeared.
- A bright observation spot — somewhere you can sit for ten minutes and watch the plant through the middle of the day without your eyes adjusting to a dark room.
- A sheer curtain or blind — the cheapest diffuser there is, and the first thing you will reach for after the diagnosis.
- Optional: a light meter app — free phone apps read lux well enough to place a spot into low, medium, bright indirect or direct sun bands.
If you only take one item from that list, take the notebook. Almost every misdiagnosis I have seen came from forgetting what the plant looked like two weeks earlier.
Step-by-Step: How to Tell If a Plant Is Getting Too Much Light
Check the Plant’s Ideal Light Requirements
Light categories describe intensity and duration together, and your plant belongs to one of them before anything else happens.
Low light means a spot a few feet back from a window, or a north-facing room where the light never lands directly. Medium light is a spot that gets light but no defined shadow, often a metre or two from a brighter window. Bright indirect light means the plant sees a bright window all day but the sun never touches the leaf itself. Direct sun means the sun lands on the foliage, and that is the only category where full midday sun is tolerated.
Almost every houseplant sold for a windowsill belongs in bright indirect light, and almost every windowsill delivers direct sun for part of the day. That gap is where most scorch begins. Foliage plants with large thin leaves — monstera, philodendron, anthurium, begonia, calathea, ferns — will scorch in strong direct summer sun in under an hour in some cases. Succulents, cacti, jade, echeveria and most cacti-family plants are the opposite: they want the sun on the leaf and sulk in shade.
Read the species requirement before you read the leaf. Otherwise you will spend ten minutes explaining away a symptom that the care label already predicted.
Inspect the Window or Growing Area
Now go and look at the spot itself, at three points in the day: mid-morning, early afternoon and mid-afternoon. Sun tracks across a window, so the same sill can be bright indirect at 9am and full direct sun at 2pm. Note which hours produce a hard-edged shadow of your hand on the wall behind the plant — that hard shadow is direct light.
Then check the things that quietly multiply exposure. Glass does not stop heat, and light coming through a single pane is far more intense than the same light outdoors under an open sky. A pale wall, a light-coloured floor tile or a paving slab outside bounces light back onto the underside of leaves that never see the sun directly. A window with no curtain, a radiator underneath, or a mirror opposite the glass all push the effective exposure up.
For grow lights, the distance rules are blunt. Low-wattage fixtures belong roughly 30–50cm above the canopy, mid-range ones 60–90cm, and high-output fixtures 90–120cm. If you cannot hold your hand above the canopy for a full minute without it feeling unpleasantly warm, the fixture is too close for a leafy plant.
| What you observe at the spot | Light level | Rough reading | Suits |
|---|---|---|---|
| No shadow, still bright, several feet from glass | Low to medium | Under 500 lux | Ferns, calathea, peace lily, schefflera low on the shelf |
| Soft, fuzzy-edged shadow for part of the day | Bright indirect | 2,000–10,000 lux | Monstera, philodendron, anthurium, begonia, most foliage plants |
| Hard, sharp-edged shadow on the leaf itself | Direct sun | 20,000 lux and up | Cactus, succulent, aloe, jade, oleander, most herbs |
| Under a grow lamp, adjustable | Whatever you dial it to | Measure at the leaf, not the lamp | Seedlings and herbs tolerate more; flowering and foliage plants less |
The numbers are not a verdict on their own — a phone app can be off by a factor of two — but they give you a repeatable reading you can compare next month instead of a vague feeling.
Look for Signs of Light Stress
Too much sunlight on a plant looks like one or more of these, and each has a reason behind it that makes the diagnosis easier.
- Bleached white or straw-coloured patches, usually where the sun strikes the leaf most directly. The green pigment has broken down and the tissue underneath has died.
- Dry, papery brown scorch on edges and tips that feels crisp rather than soft. Soft brown points to rot or overwatering; papery brown points to light and heat.
- Leaves curling or cupping away from the window, edge down or rolled into a tube. The leaf is reducing its own surface area to cut water loss.
- Midday wilting with damp soil. Bright light pushes transpiration hard, the plant cannot replace the water fast enough, and it flags before the soil has dried out at all.
- Small, thick, pale new growth with short internodes. The plant is producing compact leaves instead of stretched ones, which is the opposite of a plant starving for light.
- Variegation washing out, where the pale pattern fades toward plain green or toward a flat cream. Loss of pattern on new growth usually points at low light, but a scorched white section points at too much.
- Sudden leaf drop after a bright spell, including green leaves dropping rather than yellow ones. The plant has aborted them to conserve water.
- Growth that simply stops, with no pests, no fresh damage and no change in watering. Nothing new appears for weeks.
That last one deserves its own paragraph, because it is the sign nobody looks for. Photoinhibition is what happens when the light arriving at the leaf is more than the photosynthesis machinery can use. The surplus light becomes toxic to the reaction itself: chlorophyll degrades, the plant shuts down growth to protect itself, and nothing visible happens for a while. A plant under a lamp running fifteen hours a day can look perfectly healthy for months and simply never produce a new leaf. Visible scorch is a late signal, not an early one.
So if a plant has stalled, sits in genuinely bright light, and shows no pests or root trouble, light intensity deserves suspicion before anything else.
Position is the giveaway. Scorch from light loads onto the leaf facing the source — the window side, the lamp side — and leaves on the far side stay clean. Root rot and overwatering do not care which direction a leaf points.
Confirm the Pattern Before Moving the Plant
Brown leaves are a symptom, not a diagnosis. Before you relocate anything, compare the two sides of the problem.
| What you see | Too much light | Too little light |
|---|---|---|
| Leaf colour | Pale or bleached patches, washed-out green | Uniform deep green, pattern fading |
| Leaf edges | Crispy, papery, curled downward | Whole leaf limp and drooping, edges soft |
| Shape and growth | Small, thick, compact new leaves | Long stems, big gaps between leaf pairs, small thin leaves |
| Wilting | Midday droop that recovers by evening | Permanent droop, even with wet soil |
| Where damage sits | Window-facing leaves first | Lower, shaded leaves yellow first |
Then rule out the four look-alikes that get blamed on light all the time.
Fungal leaf spot produces spots with defined edges and often concentric rings, sometimes with a yellow halo. Sun scorch produces irregular, dry patches with no pattern and no spread over weeks — the tissue is simply dead, and it does not migrate to new leaves.
Overwatering and root rot start at the base. Leaves yellow from the bottom up, soil stays wet for days, and the trunk or stem near the soil feels soft. Light scorch hits the outermost leaves first while the soil follows a normal drying rhythm.
Nutrient burn appears as pale, uniform crusting or crisping on the oldest leaves and tips, often after a heavy feeding, and it is not biased to the window side. Light burn is concentrated on exposed surfaces. Salt build-up from tap water can look similar, and shows up as white crust on the soil surface.
Heat from a window or radiator can brown leaves without the light being the true culprit. Test by moving the plant a metre back into the same room. If the new leaves come in clean, the problem was exposure at that spot, whether light, heat or both.
Finally, check the calendar. A spot that was perfect in February can scorch in July without anything changing indoors. If symptoms appeared within two weeks of a move, of new curtains, of a lamp being lowered, or of the plant being repotted into a bigger pot right next to the glass, the timing tells you the answer before you do.
Reduce the Light and Support Recovery
Once the pattern is confirmed, change one thing at a time and change it in steps. A plant that has been living in full sun for weeks will scorch again if you drop it straight into a dim corner — that is acclimatisation, and it is why so many rescued plants lose more leaves in the new, “better” spot.
- Move it back in stages. Shift the plant 30–60cm further from the glass and leave it there for a week before judging anything. Two steps of that beats one move to the other side of the room.
- Diffuse the strongest hours. Hang a sheer curtain, or fit a blind that drops for the middle of the day. A single light-coloured sheer curtain can cut direct sun to bright indirect without costing any useful daylight.
- Raise the grow lamp, or dim it. If the fixture is dimmable, drop output by a third and check again. If it is not, increase the distance instead and never leave it closer than the warm-hand test allows.
- Trim the dead tissue once the plant is stable. Cut scorched leaves back to clean green material if you want the plant tidy, and remove fully dead leaves at the base. Severely scorched leaves still feed the plant until they are more than half brown, so do not strip a half-scorched plant bare in one afternoon.
- Hold your watering steady. Do not compensate for the damage with extra water. A plant that just lost leaf area transpires less and needs less, and watering it more while the light is still wrong converts a light problem into root rot.
- Do not feed a stressed plant. Wait for steady new growth before resuming any fertiliser routine.
- Judge recovery by new leaves only. Damaged leaves will never green up again. Watch the newest leaf at the growing point for a clean verdict.
Expect visible improvement in new growth within four to six weeks under good conditions. Some growers see clean new leaves in as little as ten days on fast plants; others wait two months on a slow, low-light species. Anything older than that with no new growth means something else is still wrong.
Common Mistakes
Reading heat as light, or light as heat. A leaf that browns at 3pm in a west window may be cooking rather than burning, and both need different fixes: heat needs distance and airflow, light needs diffusion. Watch the leaf for an hour and see whether the browning happens in the sun or persists in the shade after the sun has moved.
Moving a sun-burnt plant straight into shade. This is the most common way people make a mild problem into a total one. A plant that has been in full sun has built leaf tissue to suit that exposure; drop it into a dim corner and it will lose most of its leaves to low light within a fortnight. Grade the move instead.
Overwatering a scorched plant. Brown leaves trigger panic watering, and panic watering kills more plants than sunlight does. Damaged foliage transpires less, so the plant needs less water, not more. Let the top of the pot dry as you normally would.
Cutting healthy growth away. A half-browned leaf is still photosynthesising for the plant. Keep it until more than half of it is dead, then tidy up.
Judging recovery by old leaves. Scorched tissue is permanent. Waiting for a brown leaf to turn green is waiting forever, and it pushes people into further changes while the plant was actually fixing itself.
Fertilising into stress. A plant under light stress is not growing, so it will not use nutrients. More feeding does not push recovery along and can scorch roots in a pot that dries quickly now.
Changing several things at once. Light, position, watering and feed all adjusted in the same week means you learn nothing from the result. Fix the light, then wait two weeks before deciding what else needs changing.
When to Check Light Again
Light exposure is not a one-time setup, so the diagnosis needs repeating at a few predictable moments.
Each season. Outdoor light roughly quadruples between the darkest winter week and midsummer in Europe, and window light follows that curve. A south-facing sill that suits a plant in January needs a curtain by April. Check at the solstices rather than guessing.
Two weeks after any move. Repotting, shifting to a new windowsill, moving to a new room, adding a lamp — the plant’s response takes about a fortnight to show in new leaves.
When you see a fresh leaf. New growth is the only honest report card. Pull the plant into a brighter spot or step it back every time a new leaf arrives.
When the room changes. New furniture, a wall painted pale, a mirror, a building opposite, trees leafing out and casting shade, or a conservatory added next door all change what that window delivers. White walls and light flooring bounce more light into the leaf than you would expect.
After buying or propagating. A seedling raised under a lamp has no history of indoor window light. Introduce the two sources together slowly or acclimatise over a week or two.
Frequently Asked Questions
What does too much sunlight look like on plants?
Too much sunlight shows as bleached white or straw patches where the sun hits hardest, dry papery brown edges and tips, leaves curling away from the window, midday wilting while the soil is still damp, and small thick new growth. The tell is position: damage lands on the window-facing leaves first, while the far side stays green.
How do you recover a plant from too much light?
Move the plant 30 to 60cm further from the glass in stages, hang a sheer curtain for the middle of the day, or raise and dim a grow lamp. Keep watering exactly as before rather than adding extra to the scorched leaves, hold off feeding, and judge progress only by new growth. Clean new leaves usually appear within four to six weeks.
Why is my plant wilting even though the soil is moist?
Strong light and heat push a plant to transpire faster than its roots can replace the water, so it flags at midday even in damp soil, then recovers by evening. Root rot is the other explanation, and there the yellowing starts on the lowest leaves and the soil stays wet for days. Which side of the plant is damaged tells the two apart quickly.
How do you tell light burn from nutrient burn?
Light burn is patchy and directional, appearing on the leaves nearest the window or lamp, with dry papery scorch on exposed surfaces. Nutrient burn is even and uniform, usually showing as pale crusting or crisping on the oldest leaves and tips after a heavy feed. If damage stays on the same side of the plant regardless of feeding, it is the light.
Is 12 hours of grow light too much for plants?
Twelve hours is reasonable for most leafy plants and herbs under a lamp, and the problem is usually intensity rather than duration. Keep low-wattage fixtures 30 to 50cm above the canopy, mid-range ones 60 to 90cm, and high-output fixtures 90 to 120cm. Use a timer, dim the fixture if you can, and never leave it where the canopy feels hot to the hand.
Can a plant get too much light with no visible damage?
Yes. Photoinhibition happens when more light reaches the leaf than the plant can use, and chlorophyll breaks down before you see scorch. The plant slows or stops producing new leaves and keeps its existing ones looking fine. A plant that sits in bright light for weeks, has no pests and no root trouble, and never pushes a new leaf is the classic case.
Conclusion
Start by comparing what the plant needs against what it actually gets: read the light category for the species, watch the spot through the middle of the day, and check whether damage is landing on the window-facing leaves. If it is, move the plant back a step rather than across the room, diffuse the strongest hours, keep watering steady and leave the scorched leaves alone until the plant is stable. Scorched tissue never recovers, so the only thing worth measuring is the next leaf that opens.