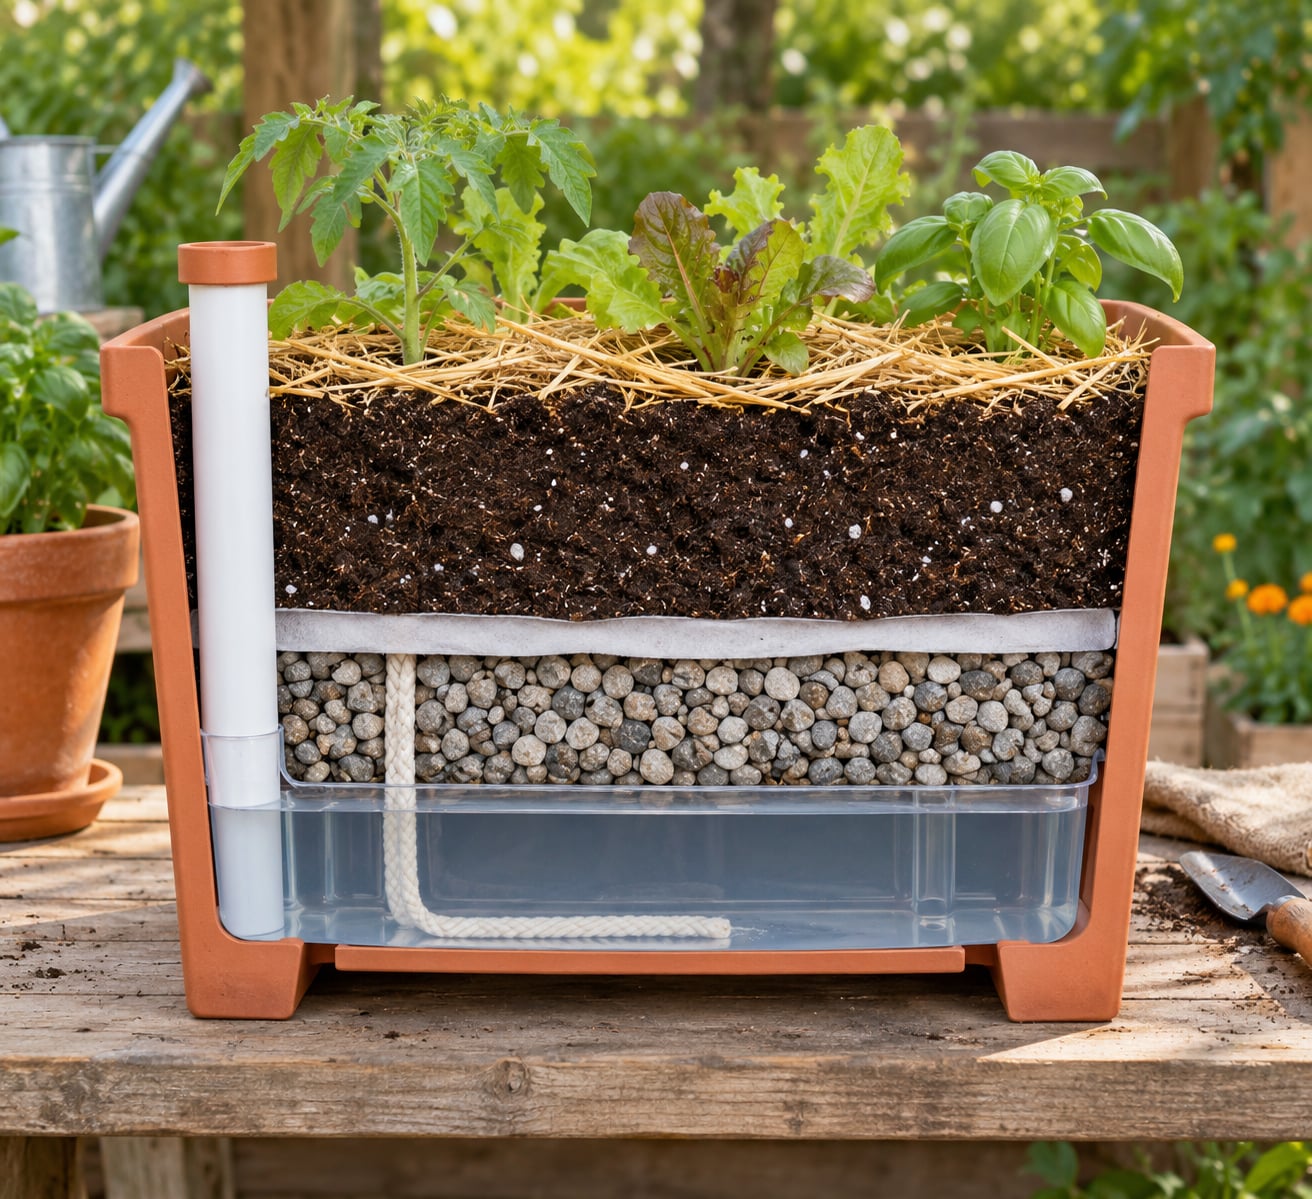
A wicking bed planter is a container with a water reservoir at the bottom, a layer of fine gravel or stone above it, and a permeable fabric that pulls water up into the soil by capillary action. You fill the reservoir instead of the soil surface, and the plants stay evenly moist. Most beginners finish a small one in an afternoon with a drill, a bucket and a bag of potting mix.
The appeal is boring and reliable: no daily watering, less evaporation, and roots that grow deeper because moisture is steady instead of alternating between soaked and bone dry. It is the single easiest way to fix the mistake new gardeners make most, which is watering by calendar instead of by what the soil is doing.
It is also not magic. A wicking bed still needs the right container, a soil mix that drains freely, and a first month of attention while plants establish. Get those three things right and the system runs itself for weeks at a time.
Table of Contents
- What You Need to Build a Wicking Bed Planter for Beginners
- Step-by-Step: How to Build a Wicking Bed Planter
- Choose a Container with the Right Drainage
- Install the Wicking System
- Fill the Planter with a Lightweight, Moisture-Retentive Mix
- Plant and Water the Wicking Bed Planter
- Common Mistakes
- Check Moisture and Adjust the Planter
- Frequently Asked Questions
- What material should I use for a wicking bed planter?
- Do I need drainage holes in a wicking bed planter?
- How often should I refill the water reservoir?
- What plants grow best in a wicking bed planter?
- Can I use a wicking bed planter indoors?
- How do I know if the wick is working?
- Conclusion
What You Need to Build a Wicking Bed Planter for Beginners
Start smaller than feels sensible. A container about 60 cm square and 45 cm deep gives you enough root space for salad greens and herbs, and it is light enough to move when something goes wrong.
- Container. A food-grade plastic tote, a planter box, a stock tank, a cut 55-gallon drum or an IBC tank. Depth matters more than width.
- Liner. Pond liner, food-grade plastic sheeting, or a purpose-made food-grade liner. Skip liner entirely if the container is already watertight plastic or timber.
- Wicking material. Coir rope, cotton rope, capillary matting strips, or old cotton towels cut into strips.
- Aggregate. Fine gravel or 5 to 7 mm screenings, roughly 5 to 7 cm deep in the base.
- Geotextile fabric. One permeable non-woven fabric sheet to stop soil washing into the stone and to let water pass up.
- Fill and overflow fittings. A 20 to 25 mm PVC pipe for filling, and a short overflow pipe or elbow fitted through the lowest point of the wall.
- Growing medium. A free-draining potting mix you build yourself from screened topsoil, compost and coarse material.
- Tools. Drill with a hole saw, spade, tape measure, level, and a hose or watering can.
One safety note before you buy anything. Gardeners on urban gardening forums have raised the question of whether recycled storage totes are food safe, and in one permies thread a manufacturer confirmed its totes were not rated for food contact and intended for storage use. Grow ornamentals in those, or line them properly before you put an edible crop in.
Step-by-Step: How to Build a Wicking Bed Planter
The whole build is six layers stacked in the right order: reservoir, aggregate, geotextile, soil, mulch, plants. The order is what makes capillary action work, and messing it up is why most first attempts fail.
Choose a Container with the Right Drainage
Pick a container that holds water at the bottom without draining it away, and that lets you get water back out when the soil is waterlogged. A watertight base with a single overflow hole at the lowest point of the wall is the ideal arrangement. A container that drains freely will never work, because the reservoir empties the moment you fill it.
Mind the wall position for the overflow. Drilling it at the base sets the permanent water level. Drilling it higher on the wall gives you a taller reservoir for a hot, dry season, and lower for a cool or wet one where you want less standing water.
Depth is the other real constraint. Water will only wick a practical distance, and gardeners on permies note that the wicking is efficient only to a certain height. Keep your soil layer between 25 and 35 cm deep. A planter with a reservoir 15 to 35 cm deep and a soil layer of 25 to 35 cm sits in the workable range, and anything much taller than that will have a dry top half.
Concrete planter boxes and timber raised beds work too, but they need a liner to hold water. Give them a 6 to 8 hour sun position, and on a balcony make sure the load is one your deck can carry, since a full reservoir is heavy.
Install the Wicking System
Drill a fill hole near the top rim and fit the PVC pipe so it stands vertically in the reservoir. This is your fill pipe, and it is the part most beginner guides skip. Without one you end up pouring water onto the soil, which defeats the point.
Fit the overflow pipe through the overflow hole at the wall, and check that it sits at the height you want the water to stop. Pour a little water into the fill pipe after the pipework is in but before you add gravel, and watch whether it comes out of the overflow. If it does not, the hole is too high or blocked.
Lay your wicking material in the reservoir once the pipework is tested. Coir rope or cotton rope works, and so does capillary matting cut into strips. Wicking cloth from an old seed-starting kit is the approach one permies poster used when they built a bed from a 55-gallon drum. The rule is simple: the wick has to touch the standing water and also reach the growing mix above it, and it must not be so tightly packed that it blocks the overflow.
For a fully automatic setup, plumb the fill pipe to a rain barrel with a float valve. Several builders on permies describe running a network of equal-height beds off a single float valve, which cuts both cost and failure points. One caveat: keep the beds level, or the high bed runs dry while the low one floods.
Fill the Planter with a Lightweight, Moisture-Retentive Mix
Soil in a wicking bed has two jobs at once. It must hold enough water to feed the plants, and it must drain freely enough that air still reaches the roots. That is why you build your own mix rather than using straight garden soil or heavy bagged potting mix, which compacts and goes sour.
A workable recipe is roughly two parts screened topsoil, one part mature compost or well-rotted manure, and one part coarse material such as fine gravel, perlite or coarse sand. Organic matter is what gives the mix its water-holding capacity, and the coarse fraction is what keeps pore space open so oxygen can move. Forum gardeners have reported perlite and vermiculite as unreliable for long-term moisture retention because they collapse and drain, so use them sparingly and add compost to hold the water instead.
Here is the layer recipe in one place. The depths below are the numbers to build to, and they are the spec most often argued about online.
| Layer from bottom | Material | Depth | Why it matters |
|---|---|---|---|
| Reservoir | Standing water below the overflow outlet | 15 to 35 cm | Stores your watering supply between refills |
| Wick | Coir or cotton rope, or capillary matting | Long enough to span reservoir and mix | Carries water upward by capillary action |
| Aggregate | Fine gravel or 5 to 7 mm screenings | 5 to 7 cm | Distributes water across the full width of the bed |
| Geotextile | Permeable non-woven fabric | Single sheet, no gaps | Stops soil clogging the stone while water passes through |
| Growing medium | Screened topsoil, compost and coarse material | 25 to 35 cm | Root zone and the wicking height limit |
| Mulch | Straw, bark or leaf litter | 3 to 5 cm | Shades the surface and cuts evaporation |
Fill in loose lifts and do not stomp the bed down. A compacted mix percolates poorly, so water backs up at the top and the roots suffocate. This is the most common reason a wicking bed ends up waterlogged, and it is entirely avoidable by filling gently.
Plant and Water the Wicking Bed Planter
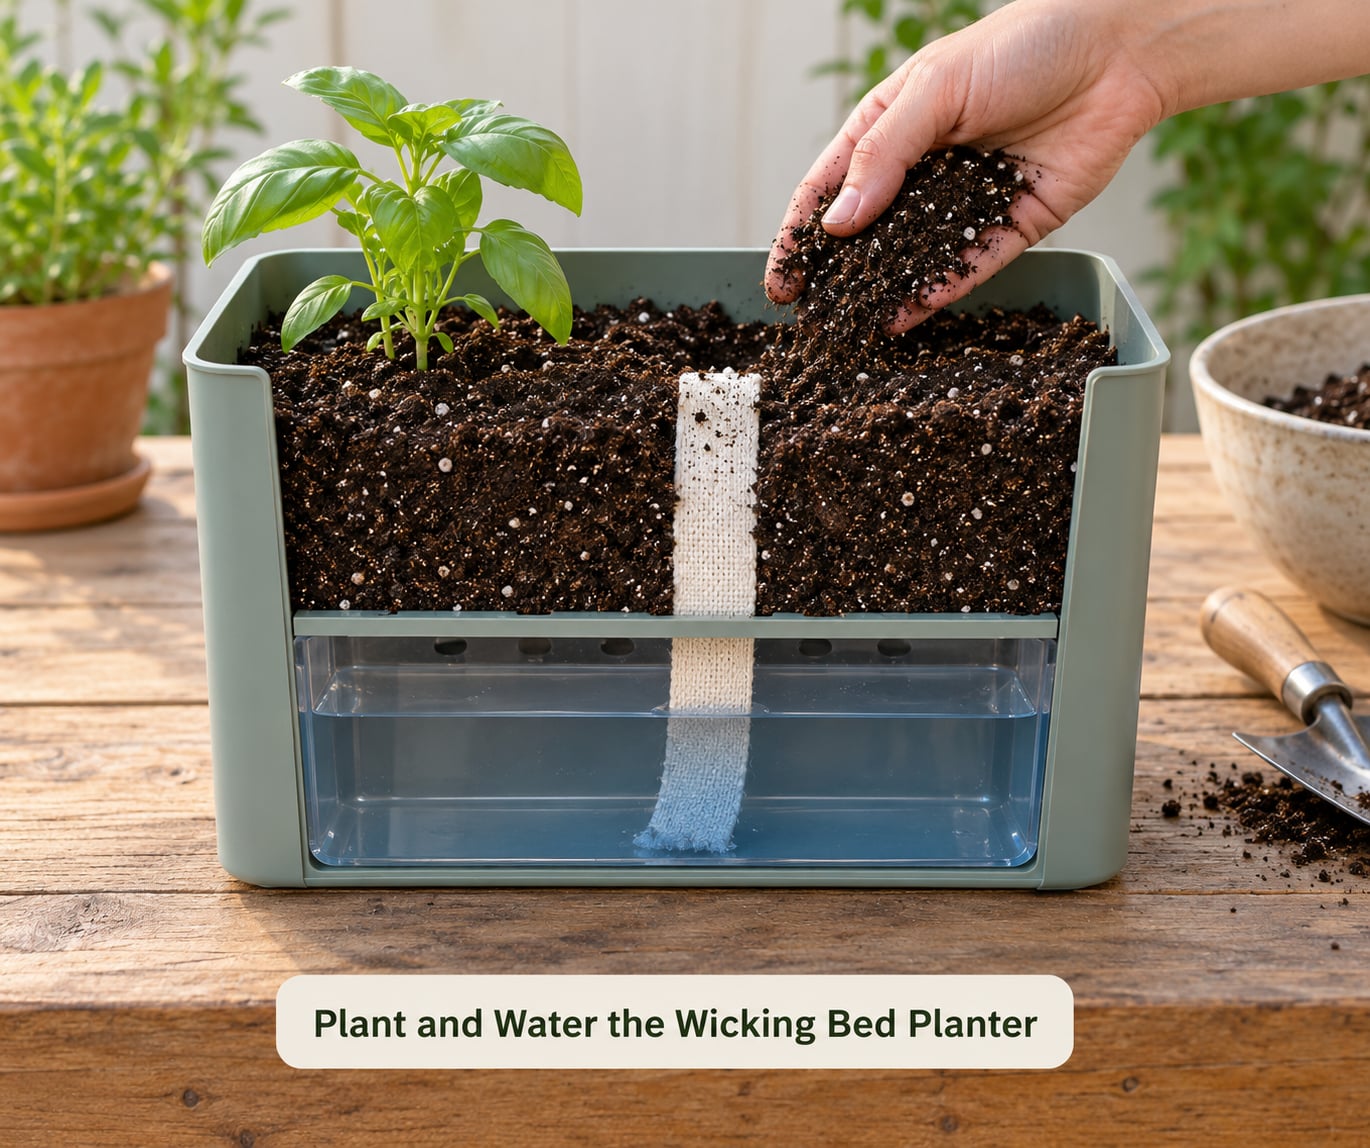
Plant at normal garden depth, which for most vegetables means burying the seed or seedling at the same level it would sit in a ground bed. Space crops at their usual spacing rather than cramming them, because a crowded root zone dries faster than the wick can replace it. Salad greens and leafy crops are the easiest first choice, then herbs, then fruiting plants such as tomatoes and peppers once you know how the bed drains.
Now saturate the mix from the top before you ever touch the reservoir. Pour water over the soil until it runs out of the overflow, and let that soak for an hour. Dry soil will not wick. The capillary link only forms through continuous wet material, and a bed filled with dry mix on day one will sit dry for a week while you wonder what you did wrong.
Fill the reservoir through the fill pipe until water comes out of the overflow, then stop. After that, top-water only when the soil surface starts to lighten and the top few centimetres feel dry. Your check that the wick works is simple: press a finger 5 cm into the mix near the wick and it should feel cool and damp, while the surface 2 cm down stays drier than the top.
Over the first fortnight, check the mix every second day. Once the top layer starts holding a steady moisture, you can back off to weekly checks and then to whatever the reservoir demands.
Common Mistakes
Nearly every wicking bed problem traces back to one of four things: the reservoir drains, the mix does not drain, the wick does not reach both zones, or the container is too deep. Work through these in order.
The bed will not wick. Almost always a dry-start problem or a wick that does not span the gap. Soak the mix from the top, and make sure the wick touches standing water in the reservoir and damp mix above. If the soil layer is deeper than about 35 cm, lower the water level by moving the overflow down.
Everything is waterlogged. The mix is too dense, the geotextile has been left off, or the reservoir is too deep for the mix to pull from. Check that the geotextile sheet covers the entire stone layer with no gaps, and that your mix includes coarse material. Yellowing leaves and a sour smell are the reliable signs.
Root rot and dead plants. Constant saturation starves roots of oxygen and creates anaerobic conditions. Add coarse material, mulch the surface, and lower the reservoir level by raising the overflow outlet.
Mosquitoes. Open reservoirs breed mosquitoes, and experienced builders on permies name the standing puddle at the bottom of the bed as the main complaint. Keep the reservoir covered with geotextile held at the water line, or add a small pump or a fish that eats larvae. Lifting the bed on legs also cuts the mosquitoes that come with damp ground-level soil.
Pill bugs. The same permies thread that mentions mosquitoes calls pill bugs an army of their own. They feed on seedlings in the cool, moist base of a wicking bed. Clear debris from under and around the container, avoid over-mulching the edges, and set starts slightly deeper so the tender growth sits above the zone they prefer.
Algae in the reservoir. Algae is not harmful to the bed, but it clogs the wick and signals too much light reaching the water. Shade it with a layer of geotextile, a board or a thick mulch layer, and check the wick is still moving water.
Salt and mineral buildup. Over months, water evaporates from the surface but salts stay. Flush the system a few times a year by filling the reservoir and letting it drain right through the overflow rather than topping up small amounts.
Poor wicking over time. Perforated pipe, often sold as Agi pipe, is a common alternative to loose gravel and spreads water faster. Beginners ask on r/Permaculture whether they need horizontal pipe at all, and the honest answer for a small bed is that loose aggregate is enough, provided it is fine enough and the geotextile is intact.
Check Moisture and Adjust the Planter
Learn the finger test and the reservoir level together. Push a finger 5 cm into the mix. Cool and damp means the wick is working. Dry all the way down means the reservoir is empty or the wick is broken. Cold, heavy and wet means you are overwatering or the mix drains badly.
Then adjust for conditions rather than for a fixed schedule. In peak summer, top up the reservoir whenever the overflow runs dry and expect to check it every few days. In cool or humid weather, raise the overflow outlet so the permanent water level sits lower, which prevents a cold, saturated base and rot. Indoors, keep the container on a tray to catch drainage and watch the mix more often, since indoor air dries faster than you expect and heat from a sunny window pulls water out quickly.
If you travel, the wicking bed is the reason to build one. Fill the reservoir to the overflow, close the fill pipe, and you have a week or more of margin. Growers on permies report beds still running after five years, moved indoors for the cold months.
Frequently Asked Questions
What material should I use for a wicking bed planter?
Coir rope, cotton rope, capillary matting strips and old cotton towels all work as the wick. The only real requirements are that the material holds water, does not rot quickly, and stays fine enough for capillary action to climb. Heavy rope and thick rope mats wick slowly. For the container, use food-grade plastic, timber with a liner, or an IBC tank with a food-grade liner, and avoid recycled storage totes for edible crops unless they are lined.
Do I need drainage holes in a wicking bed planter?
You need one overflow hole, and it is the opposite of what most people expect. Drill it at the lowest point of the wall, or a little higher if you want a deeper reservoir. That hole sets the permanent water level and lets excess water out after a heavy rain. A container that drains through its base will empty itself within minutes, which is the most common reason a first wicking bed never wicks at all.
How often should I refill the water reservoir?
Every few days in peak summer, once a week or less in cooler weather, and not at all if you are away for a week. The rule is to refill only when the overflow runs dry, not on a schedule. After the first fortnight you will be able to judge it by weight and by the moisture at 5 cm down. A reservoir that never runs dry means you have set the level too high.
What plants grow best in a wicking bed planter?
Leafy greens and salad crops first, then herbs such as basil, parsley and mint, then fruiting plants including tomatoes and peppers once you know how the bed drains. Root vegetables such as carrots and parsnips do work, contrary to a common myth, provided your mix is loose and free-draining rather than packed. Avoid crops that want dry feet, and avoid brassicas in a small bed where the dense root zone competes for water.
Can I use a wicking bed planter indoors?
Yes, and it is a good fit for a sunny windowsill or a balcony, with two adjustments. Put the container on a tray or saucer to catch drainage, and expect to check moisture more often than outdoors, because indoor heat and moving air pull water out faster. On a balcony, check the load limit before you fill the reservoir, since wet soil plus stored water gets heavy quickly.
How do I know if the wick is working?
Put your finger 5 cm into the mix beside the wick. Cool and damp below, drier at the very top, means capillary action is working properly. A dry finger at that depth means the reservoir is empty, the wick does not reach the water, or the soil layer is deeper than the wick can manage. Soaking the mix from the top is the fastest fix for a bed that has dried out and stopped pulling.
Conclusion
Start with one small container, one bag of mixed potting medium, and salad greens or herbs. The first action is simply to build it: drill the overflow, fit the fill pipe, lay the wick, add 5 to 7 cm of fine aggregate, cover it with geotextile, and fill 25 to 35 cm of loose mix on top.
The three checks that decide whether it works are the overflow setting, the wick reaching both the water and the mix, and soaking the bed from the top before you trust the reservoir. Get those right and you have planted the easiest-to-maintain bed you will ever own.
Add a second bed once the first one has proven itself, and check back on moisture rather than the calendar. That habit is the whole point of the build.