Most self watering pot failures are setup failures, not watering failures: a closed or missing overflow hole, the wrong plant, dense garden soil, a wick that never touches water, and a reservoir nobody ever cleans. Fix those five things and a self watering planter genuinely waters a plant for days or weeks. Leave them alone and it will drown the roots, grow algae, or dry out faster than an ordinary pot.
Here is the short version. Open the overflow hole before you add soil, use a light porous potting mix, choose a plant that actually likes steady moisture, keep the wick sitting in water and in the root zone, and check the reservoir every few days instead of topping it up on a schedule. The rest of this guide walks through each of those, plus placement, cleaning, and when to go back to a watering can.
Table of Contents
- What are the most common self watering pots mistakes to avoid?
- Choosing a self watering pot for the right plant
- Checking drainage before adding soil
- Using the right growing medium
- Filling and planting without trapping air
- Setting the reservoir level correctly
- Avoiding overwatering and root rot
- Preventing the wick from drying out or overflowing
- Placing the pot in the right location
- Maintaining the reservoir and cleaning the pot
- When to water by hand instead of relying on the reservoir
- A simple self watering pot checklist
- Frequently Asked Questions
- What plants don’t like self-watering pots?
- When not to use self-watering pots?
- Can you overwater with self-watering pots?
- What are common problems with auto watering?
- What is the most common mistake made with container plants?
- Are self-watering pots good for indoor plants?
What are the most common self watering pots mistakes to avoid?
The mistakes that kill plants in self watering pots fall into four groups: choosing badly, filling badly, positioning badly, and ignoring the pot afterwards. A wrong plant in the wrong pot, or a good plant in dense soil with a closed drain, will fail no matter how well you fill the reservoir.
The table below maps the symptom you can see to the cause underneath it and the fix that actually works.
| Symptom | Likely cause | Fix |
|---|---|---|
| Yellow lower leaves, sour smell | Reservoir left permanently full, no overflow | Open the overflow hole, empty part of the reservoir, let the mix dry down |
| Green film on reservoir walls | Light hitting standing water, water never refreshed | Empty and scrub every two to four weeks, keep the pot shaded or opaque |
| Translucent spots on leaves | Substrate stays saturated, roots lack oxygen | Mix in perlite, drop the fill level, repot into a drier mix |
| Plant wilts two days after filling | Wick not reaching the water, or root ball no longer touches it | Reseat the wick in water and in the root zone, repot if root bound |
| Small clouds of gnats around the pot | Constantly moist surface, stagnant reservoir | Let the top inch dry, clean the reservoir, use sticky traps |
| White crust on inner walls | Hard water, no flushing of the reservoir | Rinse at every refill, use filtered or distilled water in hard water areas |
| Roots brown and mushy | Waterlogging and low oxygen in the wetted zone | Remove plant, cut dead roots, repot into fresh airy mix, keep the plug open |
| Water sits in the saucer for days | Outdoor pot catching heavy rain with the plug closed | Open the plug in rain, empty the saucer, raise the pot on feet |
Choosing a self watering pot for the right plant
Match the reservoir to the size and thirst of the plant, not to the shelf it will sit on. A small reservoir dries out every two days in summer and a big one on a fern can hold weeks of water, which is more moisture than a succulent root system can survive.
Three things decide whether a pot fits: the mature size of the root ball, the depth of roots, and how often the plant would dry out in that spot. A plant that needs a drink twice a week in your climate wants a reservoir that lasts several days, not one that empties overnight. A plant that wants to dry out between waterings does not want a self watering pot at all.
| Plant type | How it copes | What to do instead |
|---|---|---|
| Herbs, strawberries, leafy greens, chard | Strong, productive in containers with steady moisture | Use a medium to large reservoir, refill weekly in summer |
| Tomatoes, peppers, larger shrubs, dwarf citrus | Work well with a big reservoir, but need a deep pot | Match the pot volume to the mature plant, not the seedling |
| Tropical foliage plants, ferns, aroids | Happy with even moisture, but need air around roots | Keep the mix airy and leave the overflow open |
| Golden pothos, most hoyas, snake plant, zz plant | Survive, but suffer in permanently wet mix | Let the reservoir run dry between fills, or use a drainage pot |
| Succulents, cacti, most orchids, bonsai | Rot in a constantly moist root zone | Use a pot with drainage holes and a gritty mix |
Placement matters at purchase time too. An indoor-rated pot is often fully sealed with no overflow at all, which makes it a poor choice for a balcony or patio where rain lands in it. A pot meant for outdoors is usually built from thicker plastic or a liner that can handle being left in sun, and those are the ones that work indoors as well.
Checking drainage before adding soil
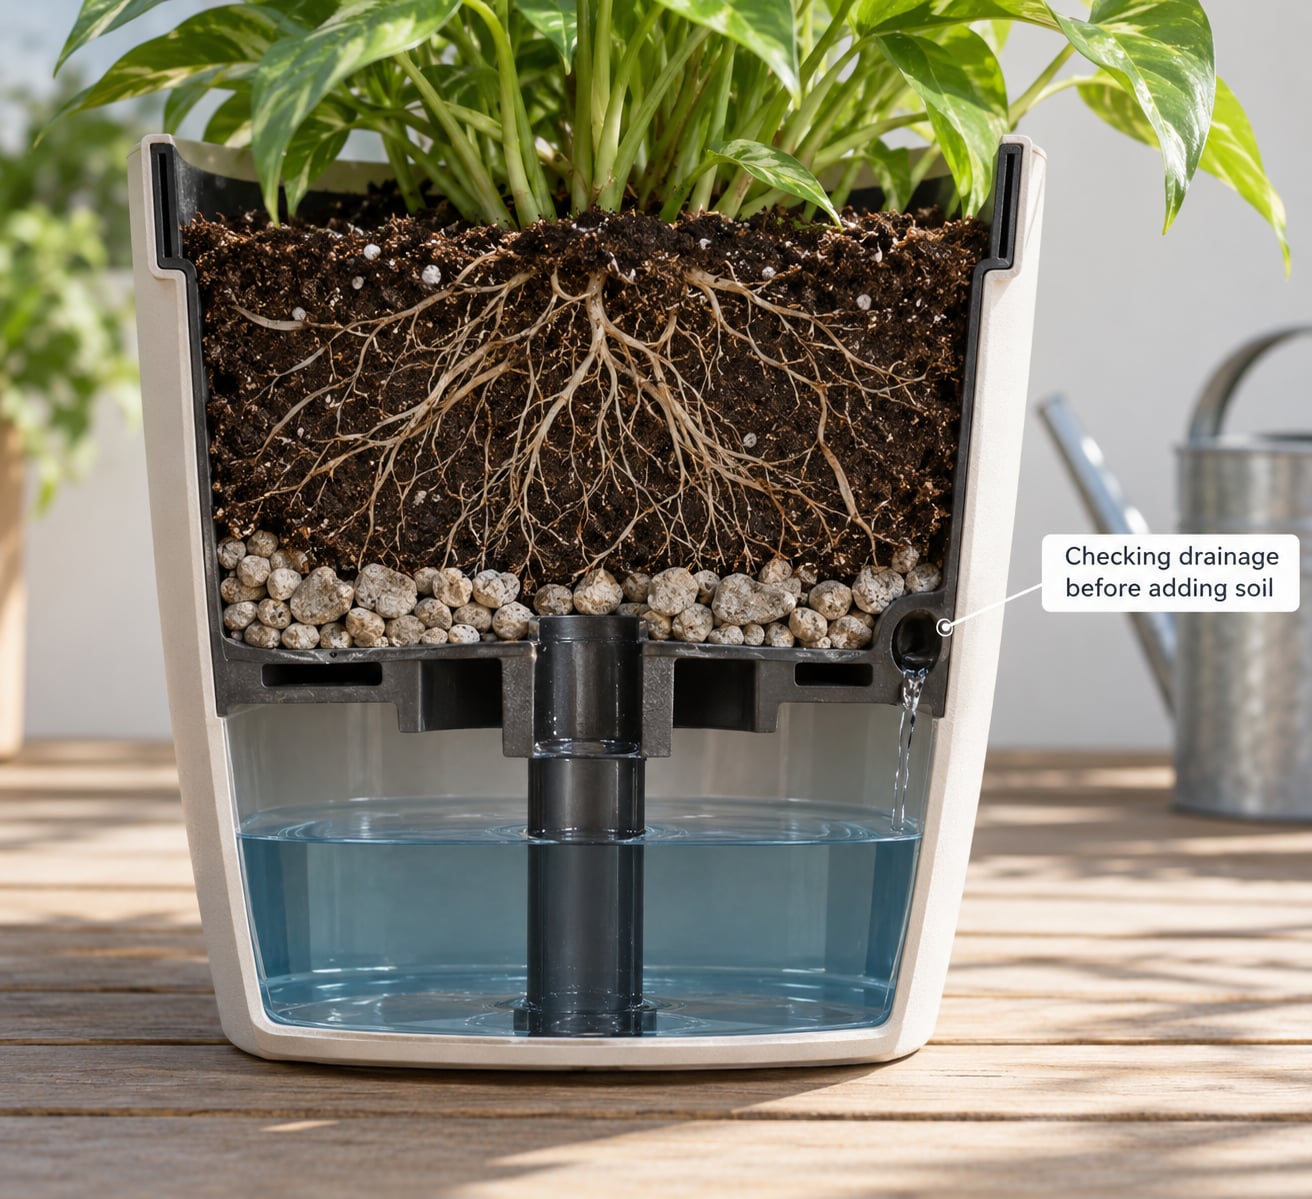
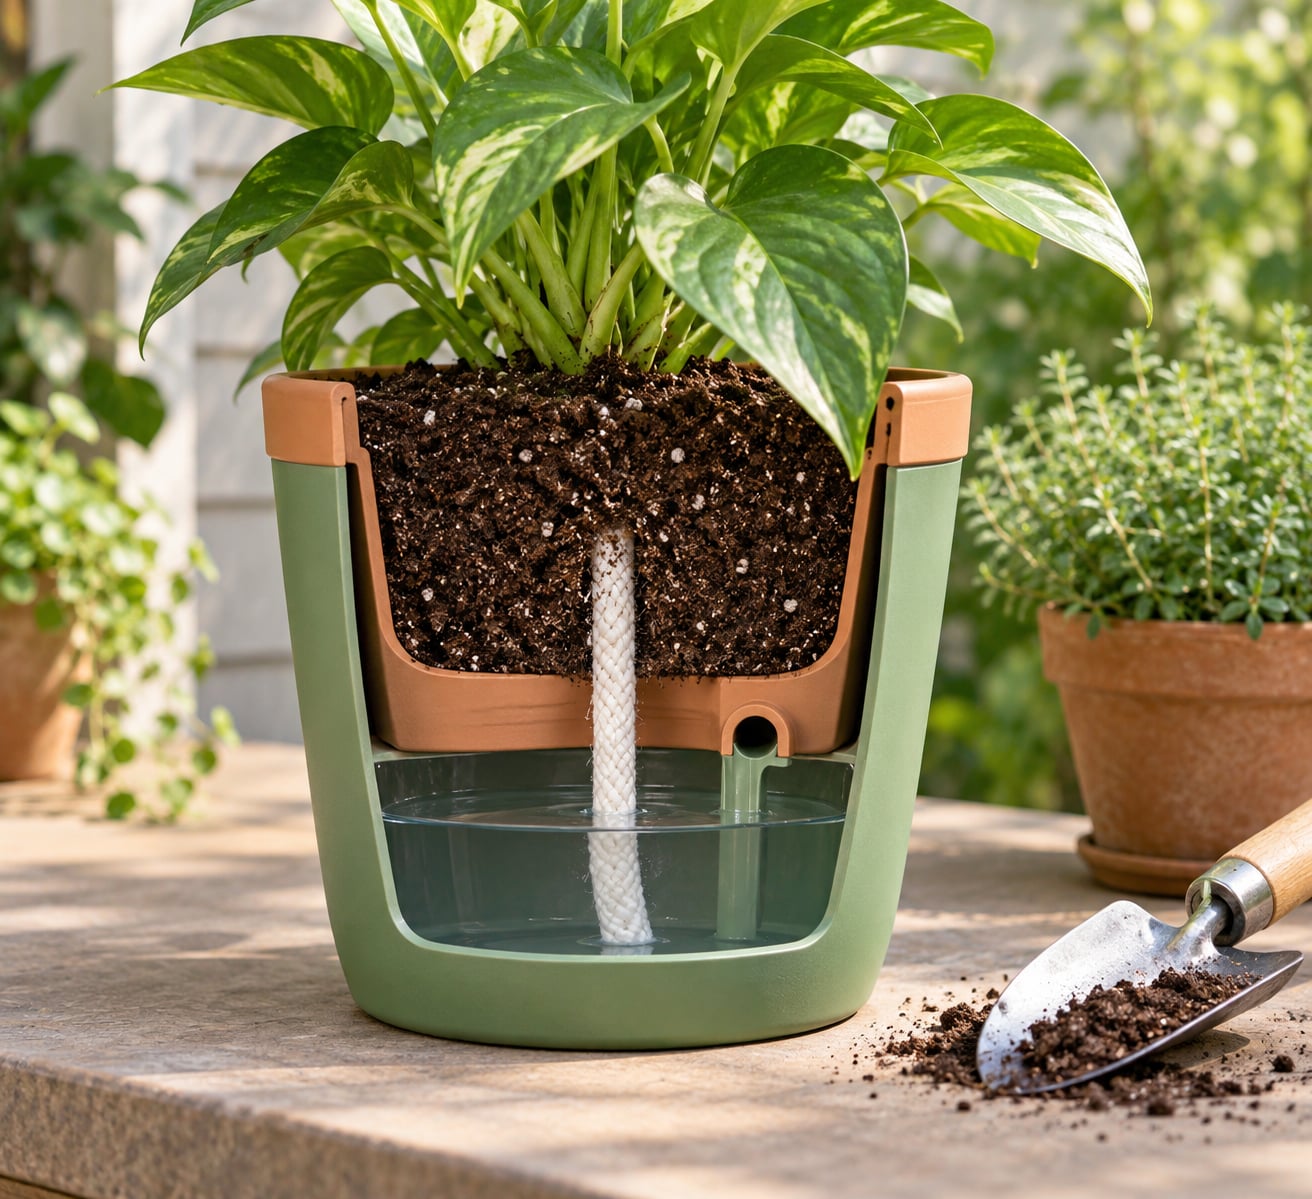
Check drainage before you add soil, because once the pot is planted the overflow is impossible to reach. Most self watering containers have an overflow hole that sits a couple of centimetres above the bottom of the water chamber, and it is often covered by a removable plug or left as an indented circle ready to be punched out.
Understanding what this hole is for matters more than most people expect. A drainage hole lets excess water leave the whole pot and is what you would expect from a normal planter. An overflow hole only stops the reservoir from overfilling: once water rises to that opening it spills out of the chamber, but the soil above it keeps holding whatever the roots have not used. Gardeners often call a bathtub-style overflow a drain, and the confusion causes most of the overwatering in this category of pot.
If the opening is covered, clear it before planting. On plastic, look for a slightly indented circle and push it out with a screwdriver and a cloth for grip, or melt it carefully with a heated tool. On terracotta, concrete, or fiberstone, drill from the outside with a masonry bit, starting small and working up so the wall does not shatter. On glazed ceramic, use a diamond bit with steady pressure and a little water to keep the glaze from chipping. On metal, a step bit or a hole punch is usually enough.
While the pot is empty, also check the gap between the bottom of the inner pot and the water. Roots need oxygen, and a pot that holds more water than the plant can use creates airless conditions in exactly the zone where the roots are wettest. An overflow hole a few millimetres above the water line is what prevents that.
Using the right growing medium
Use a lightweight, porous potting mix designed for containers. It needs to hold enough water to feed the wick while still letting air into the root zone, and garden soil, dense compost, or a coarse chunky mix will not do that job.
Heavy garden soil is the single most common planting mistake in self watering pots, and it is a frequent complaint on r/houseplants where people transplant into these pots with whatever is in the bag. Dense soil wicks poorly, so the plant stays dry even with a full reservoir, and it compacts into a solid mass that the wick cannot move water through. Reused potting mix from an old root-bound pot brings in old pathogens, depleted structure, and a wicking imbalance all at once.
Mixing a little perlite into a standard container mix improves air movement and keeps the wick moving. Bark fines or coconut coir hold moisture without closing the pore space, and a thin layer of coarse material at the base keeps soil from washing down into the water channel. Add water-retaining crystals sparingly, since they hold a lot of water and can push a thirsty plant straight into the overwatered state.
Filling and planting without trapping air
Plant in a sequence that keeps the mix in contact with the wick and the root ball settled, because a gap of air between the wick and the soil is the thing that quietly stops a self watering pot working.
- Moisten the potting mix first, so it is damp but not dripping when it goes in.
- Fit the wick into the water channel and run it up through the base of the inner pot before any soil is added.
- Add a shallow layer of mix, set the plant at its proper depth, then fill around the root ball.
- Tap the pot gently to settle the mix instead of pressing hard, which leaves air pockets.
- Leave the headspace the pot is designed for, usually a finger’s width below the rim, so water can be poured in without washing soil over the edge.
- Water from above once, thoroughly, to wet the whole column and draw any trapped air out of the mix.
That first top watering matters more than it looks. A dry root zone and a dry wick will not pull on the reservoir at all, so a freshly planted pot looks like it is being ignored for a week or more. Watering the whole pot once gives the wick something to grip and the roots a wet surface to grow into.
Setting the reservoir level correctly
Fill the reservoir to the line marked on the chamber, then adjust from there based on the plant, the size of the pot, the weather, and the mix you used. A heavier mix holds less water than an airy one, so a clay-based pot with dense soil needs a lower fill level than the same pot filled with a loose aroid-style mix.
Many people fill to the maximum and then leave it there, and that is the mistake behind most of the yellowing leaves people blame on the pot. A permanently full reservoir keeps the lower layer of the root zone saturated, and roots in saturated soil cannot get the oxygen they need. The plant is not thirsty, it is drowning in the wettest part of the pot while the surface looks deceptively normal.
Fill less often rather than more. Run the reservoir down, let the top inch or so of mix dry, then refill. In peak summer that might be every four to five days for a medium container on a sunny patio, and every ten days or more for a small indoor pot in winter. Watch the water level rather than the calendar, and check it every few days until you know the rhythm for that pot in that spot.
Avoiding overwatering and root rot
Yes, you can overwater a self watering pot, and it happens more easily than people expect because the design feels like insurance against exactly that problem.
Watch for these signs of excess moisture: leaves yellowing from the bottom up, soil that stays wet to the touch at the bottom of the pot, a sour or swampy smell, green film or algae inside the chamber, and translucent blisters or corky spots on leaves. Roots that smell sour, or that turn dark and mushy instead of firm and pale, confirm it. Edema shows up as those translucent spots, and growers on r/alocasia frequently trace it back to a substrate that never gets a dry-down cycle.
Root rot happens because the wetted zone of a container runs out of oxygen. Water displaces air from the soil pore space, and the organisms that thrive without oxygen take over while the roots suffocate. Self watering pots do not prevent this; a permanently full reservoir creates it faster than a hand-watered pot would.
If you find root rot, take the plant out, cut away dark roots with a clean blade, repot into fresh airy mix, and leave the reservoir empty for several days so the root zone dries. That is the whole rescue, and it works better than most people expect when they act quickly.
Preventing the wick from drying out or overflowing
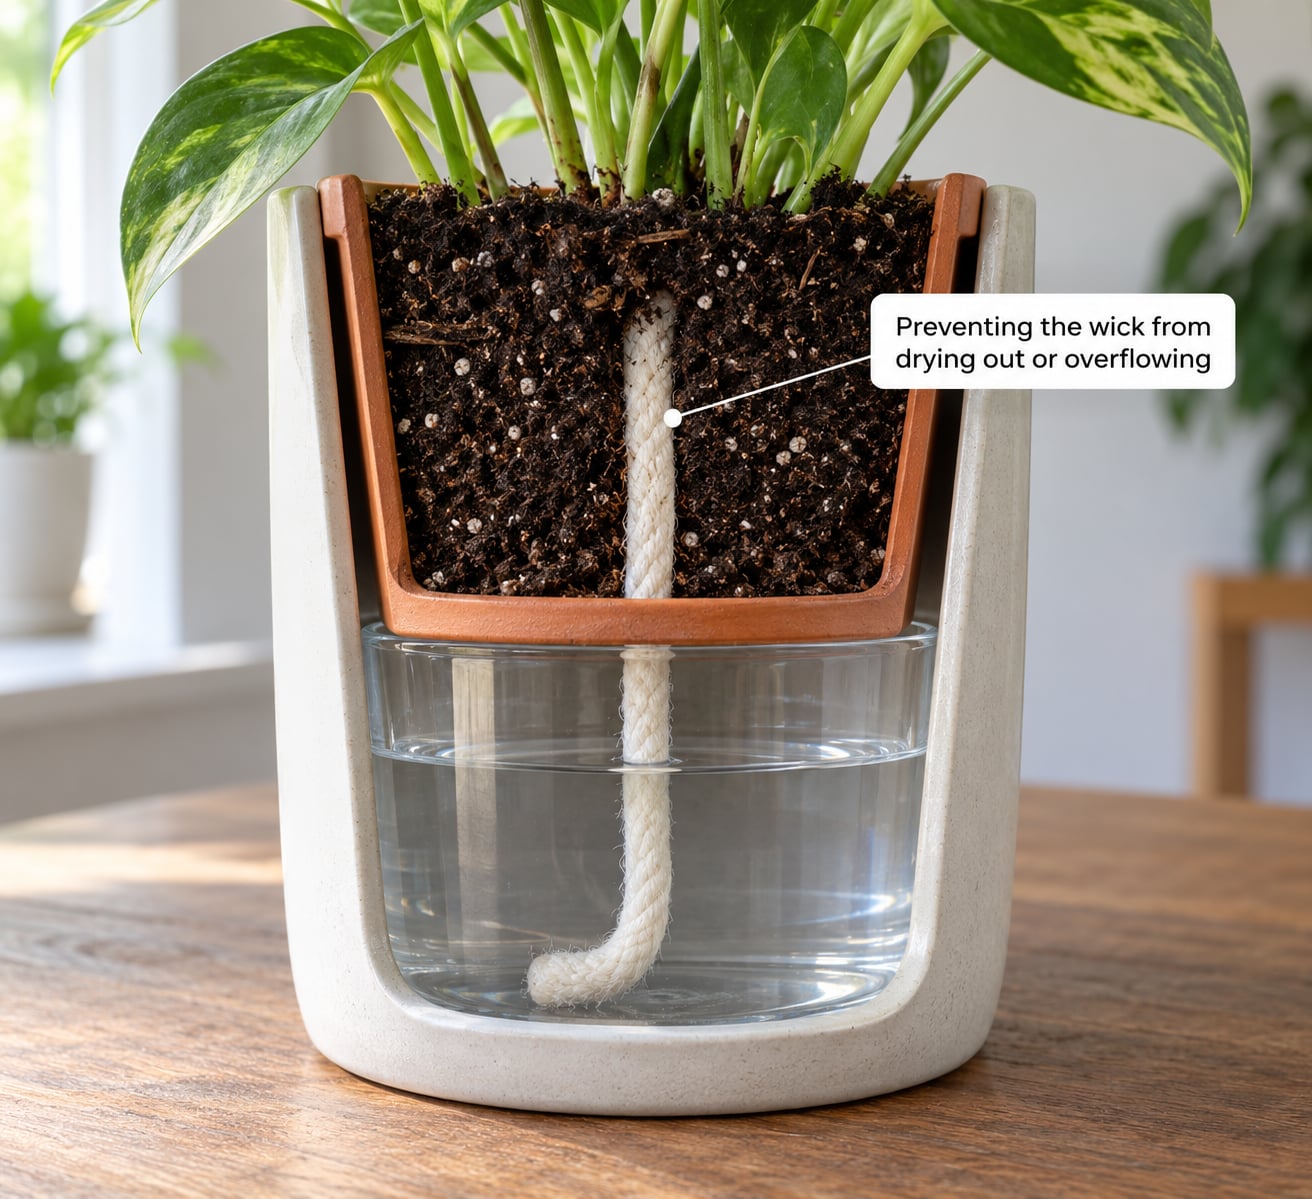
The wick has one job: stay in contact with both the water and the root zone so capillary action can move water upward. Failures come from the wick losing contact at one end or the other, and the two ends fail for different reasons.
A wick dries out when the reservoir runs empty, when the wick is not long enough to reach the water at the bottom, or when the inner pot is raised on a grid so the wick never enters the chamber. Because the plant drinks from the bottom, checking the topsoil tells you nothing about whether it is thirsty. If the reservoir is empty, the wick is doing nothing.
A wick overflows when the reservoir is too full for the plant’s demand, or when a mix that wicks too eagerly pulls more water up than the roots can use and the surplus pushes air out of the soil, leaving wet spots. Capillary mats and wide wicking strips move more water than a narrow cord, so match the wick width to the pot size rather than using whatever is in the drawer.
Cotton cord, strips of capillary mat, and some proprietary foam wicks all work, but cotton has a limit: it grows mold and breaks down, and it stops wicking reliably once it is coated with hard water deposits and fertilizer salts. Replacing a wick is a five-minute job if the pot is designed for it. If it is not, the wick has to be threaded under the root ball, so plan for a repot rather than trying to fish it out from the top.
Mature plants cause a subtler version of the same failure. As the root ball expands and fills the inner pot, roots can grow over the wick entirely, so it is technically in the root zone and the plant still dries out. When a plant that used to be fine suddenly wilts within a day of a refill, repot it a size up and reposition the wick so it sits against the outer face of the root ball.
Placing the pot in the right location
Where the pot sits changes how fast the reservoir empties, and both directions cost you: too much sun drives evaporation faster than the plant can use, and too little leaves the wick and roots sitting in cold damp soil.
A pot on a south-facing concrete patio in July can lose several centimetres of reservoir water a week to evaporation alone, with the plant using only part of it. A north-facing balcony in autumn barely moves at all, and the same fill level that worked in July now causes problems. Check the level weekly and adjust with the season rather than staying on one setting.
Heat-reflecting walls are the other trap. A pot tucked against a south or west wall bakes from behind as well as above, and light-coloured walls make it worse. Leave a few centimetres of air behind the pot or group pots where they shade each other slightly without smothering them.
Outdoors, rain changes everything. A closed drainage plug plus a pot catching heavy rain equals a flooded root zone, because the plug is the only thing stopping overwatering when water enters from the top. Leave the plug open during wet weather, empty any saucer after a storm, and raise the pot on feet so the outlet is never sitting in a puddle.
Indoors, watch for heating vents, radiators, and fireplaces, which dry the air around the pot and pull moisture out of a wick faster than the plant transpires. A pot directly above a radiator dries at a very different rate from one in the same room with normal airflow. The fix is a moisture meter with a long probe, since you cannot check this one from the surface.
Maintaining the reservoir and cleaning the pot
A working routine keeps the chamber clean enough to stay invisible: check the level every few days, empty and rinse at each refill rather than topping up, and give the whole pot a proper clean on a schedule through the growing season.
| When | What to do |
|---|---|
| Every few days | Check the level, top up only when low |
| At every refill | Empty the chamber and rinse it, dump any grey water, wipe the walls |
| Every two to four weeks in the growing season | Scrub the chamber, rinse the wick, clear the overflow channel of soil |
| Every six to eight weeks in winter | Deep clean, since growth and evaporation both slow down |
| Before replanting | Disassemble, wash, and dry the pot completely |
| Right after repotting | Leave the reservoir empty for several days |
When you do a deeper clean, work gently. A dilution of roughly one part white vinegar to three parts water, left to sit for ten to fifteen minutes, lifts mineral film and light algae well enough. Steel wool scratches plastic and glazed surfaces permanently, boiling water warps plastic components, and bleach leaves residue that is not good for roots, so avoid all three. A few percent hydrogen peroxide solution works as a rinse if you prefer something that leaves no residue at all.
Mineral deposits show up as a white or greenish crust on the inner walls, and plant care forums get asked constantly whether their water is too hard. If you see it, rinse the chamber at every refill and use filtered or distilled water for the next few refills to see whether the build-up slows. Fungus gnats follow the same pattern: constantly damp surface plus stagnant water, so let the surface dry down and clean the chamber rather than reaching for insecticide.
When to water by hand instead of relying on the reservoir
Top watering is not cheating. There are situations where a self watering pot needs a hand with a can, including a new plant in its first two weeks, a dry root ball or a wick that has not established, extreme heat where a small reservoir empties daily, and any plant moving between seasons as its demand changes.
Most beginner advice skips straight to sticking a finger in the soil, which is decent for a normal pot and useless in a bottom-watered one, because the surface dries while the roots are sitting in water. Test lower down instead. Push a finger or a chopstick into the mix against the inner wall, halfway between the surface and the wick, and check that spot. Cool and damp means leave it alone. Dry and warm means water from above and refill the reservoir the same day.
A long-probe moisture meter gives you the same read without digging, and it is the single tool that makes sealed or hard-to-reach reservoirs manageable. If you only buy one thing for this hobby, buy that rather than a decorative pot.
A simple self watering pot checklist
Run through this list whenever you set up a new self watering pot, and again at the start of each season.
- Pot fit: reservoir size and pot volume match the mature plant, and the pot is rated for where it will sit.
- Plant fit: the plant wants steady moisture and is not a succulent, cactus, most orchid, or bonsai.
- Drainage: the overflow opening is clear, or has been punched or drilled out, and the plug is open.
- Medium: a lightweight container mix, loosened with perlite, never garden soil or reused mix.
- Wick: seated in the water and against the root ball, long enough to reach the bottom of the chamber.
- Planting depth: settled without hard pressing, with the headspace the design calls for.
- Reservoir: filled to the marked line, no higher, and run down between fills rather than topped up.
- Placement: out of direct reflected heat, with the outlet clear of any saucer.
- Observation: a moisture check at root level every few days, not a watering schedule on autopilot.
If you do one thing after reading this, look at the bottom of a pot you already own. Clear the overflow, empty the reservoir, and push a finger halfway down the mix before you add any more water. That single check tells you more than any amount of guessing from the top of the pot.
Frequently Asked Questions
What plants don’t like self-watering pots?
Succulents, cacti, most orchids, and bonsai all struggle, because they need the root zone to dry out between waterings and a reservoir keeps it evenly moist. Golden pothos, snake plants, and most hoyas survive but grow poorly in permanently wet mix. A plant already showing edema or translucent leaf spots is telling you the same thing. Use a pot with drainage holes and a gritty or airy mix for those instead.
When not to use self-watering pots?
Skip them when the plant needs a dry-down cycle, when you are starting from seed or an unrooted cutting, when the pot has no overflow opening and you cannot add one, and when the pot will sit outdoors in freezing weather. Many indoor-rated pots are fully sealed and not frost proof, so a single cold snap can crack the chamber. In all of these cases a normal drainage pot is the better tool.
Can you overwater with self-watering pots?
Yes, and it is the most common failure. A reservoir left permanently full keeps the lower root zone saturated with no oxygen, which causes root rot, yellowing lower leaves, a sour smell, and translucent spots on foliage. A closed overflow plug makes it worse, since rain or hand watering cannot escape. Open the plug, fill only to the marked line, and let the mix dry down between refills.
What are common problems with auto watering?
The usual problems are a wick that no longer reaches the water, a root ball that has outgrown the pot and grown over the wick, algae and mineral build-up in a chamber nobody empties, a plug left closed so rain floods the pot, and a plant that wilts because the reservoir is empty and the surface check tells you nothing. Most of these show up first as yellowing leaves, a sour smell, or a green film inside the chamber.
What is the most common mistake made with container plants?
Using garden soil instead of a container potting mix. Garden soil is too dense to wick properly and compacts into a mass with no air space, so roots suffocate even when the pot is full of water. Add perlite or bark fines to loosen it, and never reuse mix from an old root-bound pot, which brings depleted structure and old pathogens with it.
Are self-watering pots good for indoor plants?
They work well for tropical foliage plants, ferns, and aroids that like even moisture, and for anyone who travels often. Check for an overflow opening first, since many indoor models are fully sealed and cannot be drained. Give the pot a spot away from radiators and heating vents, and use a long-probe moisture meter so you can read moisture at root level instead of judging from the dry surface.
That is the whole guide in one line: match the pot to the plant, keep the overflow open, use a mix that breathes, and let the reservoir run down between fills. A self watering planter is a slow, steady supply, not a permanent pool. Treat it that way and the watering chore mostly disappears; fill it to the brim and never empty it and you will have the yellow leaves and sour smell that drove you to buy the pot in the first place.